Hello and welcome to this Blog Post edition of #Ask Susie. In this week’s post, we’re going to look at how we can create a Digital Signage Layout in Contribute Signage, Software.
How to Create a Layout
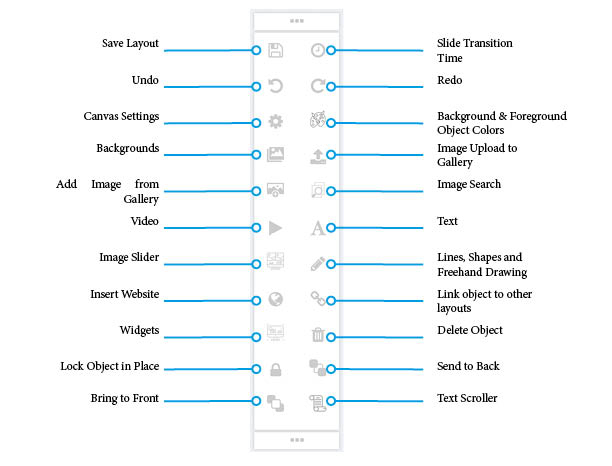
In order to create your Digital Signage Layout, you need to use the floating tools to add elements to your page. Below is an explanation of what each of the tools does.
Canvas Settings
The first thing that we are going to do is set the page orientation and the resolution of our layout. Using this tool, we are able to change the background colour of the canvas as well as the colours for the shapes and line tools.
Backgrounds
Next, we’re going to add a couple of the pre-prepared backgrounds using this button. Simply click on the background to add it to your canvas.
Delete
To delete an object or image, make sure it is selected and then click on the trash can icon. There will be a confirmation prompt before you delete anything.
Image Search
This is the online image search tool. There are over 2 million images in the online gallery. Enter your search term and then click search. Click on an image to add it to the canvas.
Slides / Tabs
We have the ability to add multiple slides within a digital signage layout. Click on the “Add New Slide” button at the top to create a new blank slide. You are able to adjust the time between each slide as well as the transitions with this tool.
Add Image
We are able to add images from either your gallery or from a URL by clicking here. Your gallery will be empty the first time that you open the software, so you can add images from your local machine by clicking here. Once in the gallery, click on the image to add it to your canvas.
Lock Object
Objects and images can be locked in place so that they cannot be moved by using the padlock icon. Here you can see we are not able to move the image until it is unlocked.
Text
To Add text, click on the text tool, choose your font size and type then add your text. You can move and resize it once it is added to the canvas.
Do / Undo
If you add an object that you don’t want or delete something that you do want to keep, use the “Do” and “Undo” buttons on the toolbar.
Website Embed
You are able to embed a website into your Signage layout using this tool. Just enter the URL and then click on Add.
Widgets
We have a number of widgets available with this option here, you are able to add the time and date, search for your location and add the weather and also add a Twitter Feed. Youtube and vimeo videos can be embedded by entering the URL and if you scroll down, you can choose an RSS news feed and select the options you want to use then add it to your canvas.
Layers
We have layers built into the canvas so using these buttons you can move objects forwards or backwards in the layers on screen.
Text Scroller
Use this tool to add a text scroller to the canvas. Choose the direction of the text, the speed (a larger number is faster) the font size then enter your text. Scrollers can be moved and resized on the canvas.
Videos
Videos can be added to the canvas by clicking on this tool. Please note, they do not play on the canvas until previewed or sent to a playback device.
Image Slider
Here we have an image slider tool. First, you need to select the transition between images, then the number of seconds each image is shown for. Then it is time to add images. Click on the “Add Image” button. Now, from your gallery, you can add images. You are also able to upload more images too if you need them from your own computer. To add the images to the slider, click on add image. Then, close the window when you are done. You can re-order your images by dragging them and then click “Add Slider” to have them added to your canvas.
Links
Using the link tool, we are able to make an object touch sensitive so we can link to other layouts we have created. This is great for creating things like Wayfinders or Info Signage.
Save
When we are done with our layout, make sure you click the save icon. We can then click on the Live Preview to see on our computer what the signage will look like.
Watch a Video
Hello there and welcome to the editor. Here is where we are going to create our signage layouts. You are going to use the floating toolbar here to create your layout. Digital signs are made with images, video and text so why not get started by using one of our backgrounds and adding some text to your layout. Simply click on the tool to use it. If you would like me to explain what each of the tools do in more detail, click the “Toolbar Help” button below to open a short video. When you are finished creating your layout, make sure you hit the save button, then, click on the “Send this layout to a screen” button in the toolbar above.
About Contribute Signage
Digital Signage creation should not be complicated.
YOU SHOULD NOT HAVE TO BE A GRAPHIC DESIGNER TO BE ABLE TO CREATE GOOD LOOKING DIGITAL SIGNAGE
Our approach to digital signage is that you should not have to be a graphic designer in order to create good looking yet functional layouts. You also should not have to outsource this task to a 3rd party company which costs you money. You should be able to manage, create and update your own digital signage layouts whenever you like, from any browser. Contribute Signage allows you to do just that.
With Contribute Digital signage we have created a super simple drag and drop, WYSIWIG editor that allows you to import from the media gallery your own images and videos, add clocks, and other widgets like a Twitter feed and the latest weather. All of this is done right inside a browser from any connected device.
Free Trial
We offer a 15-day free trial. You so not need any credit card information and it is totally unlimited. We will help you with creating a layout and Susie will be there every step of the way. Why not try it now – head over to Contribute Signage,
Deploying and Managing Your Devices & Signage
SEE THE DEVICE’S LOCATION, GROUP PLAYERS, SEE WHICH ARE ONLINE, OFFLINE AND WHICH OS IS BEING USED – ALL FROM THE WEB CONTROL PANEL, ANYWHERE, ANYTIME ON ANY WEB-ENABLED DEVICE.
In order to add a device to your control panel, firstly, you need to download and install our Playback App. Once installed, the App will give you a unique registration code. Assign the location of the device and enter the registration code in your web control panel and your playback device will be connected to your account. You can see the status of the device from your control panel as well as its location on google maps. This makes managing multiple locations from the same web control panel simple and easy.
You are able to organize your playback devices into folders. You are also able to group your devices so that you can have all your reception areas playing the same “reception” layout channel etc. Being App based means that we can convert any of your existing screens into a playback device, simply by installing the App onto that device, or a hardware dongle such ass a Windows or Android stick.
Create, Deploy, & Manage
We know that Digital Signage needs to be simple. Install our App on your device. Connect your device to your TV or Monitor. Add the device to your online web portal and you are good to go! Create, deploy and manage your signage from any device, anywhere.
User Level Access
HAVING THE ABILITY TO ADD COLLEAGUES ONTO THE WEB CONTROL PANEL BUT LIMIT THEIR ACCESS TO CERTAIN AREAS OF THE SYSTEM IS A MUST FOR LARGE-SCALE DEPLOYMENTS. WITHOUT SYSTEM YOU CAN LOCK DOWN ALL ASPECTS OF THE DIGITAL SIGNAGE WEB CONTROL PANEL GIVING THE ADMINISTRATION TOTAL CONTROL.
FULL ADMIN CONTROL
Establish a hierarchy of users
Full control over what users are able to do and access
Features
UNLIMITED USERS
There is no limit on the number of users you can have in an account

WYSIWYG Editor
Create your layouts in our drag and drop editor online

Manage Devices Online
Manage all your digital signs online from our control panel

Apps
Android, MAC & Windows Playback Apps

Multiple File Formats
Import Video and Images into your media gallery

Crisis Management
Send Crisis Management messages to your devices with a singe click

Scheduling
Schedule your playback layouts for exactly when you want them
2m+ Image Gallery
Over 2 Million searchable images in the gallery

Simple Pricing
Straight forward one-time pricing

Hardware Players
Windows and Android Hardware Players available.

Cloud-Based
Cloud-based so easy to manage and no updating

User Control
Have full control over your users and what they have access to.

Touch Enabled
Create touch-friendly layouts online

[/fusion_text][/fusion_builder_column][/fusion_builder_row][/fusion_builder_container]

Beyond the Textbook: Interactive Flat Panels for Fun & Engaging Lessons (and Unexpected Benefits)
Remember the days of fighting to stay awake in class, [...]
Captivate Your Classroom: 5 Interactive Flat Panel Activities They Won’t Forget (Even Math!)
Remember Mr. Wilson's droning lectures on the Pythagorean Theorem? Enough [...]

Gamify Your Classroom! Using Interactive Flat Panels for Games & Quizzes (and Unlocking Hidden Benefits)
Remember the groans that echoed through the halls whenever pop [...]

Lights, Camera, Action! Using Interactive Flat Panels for Student Presentations (and Reducing Presentation Anxiety)
Remember the clammy hands, racing heart, and mumbled words that [...]

Interactive Flat Panels vs. Projectors: A Head-to-Head for Educators (Beyond the Price Tag)
Remember the days of wrestling with projector cords, battling classroom [...]

The Budget-Conscious Educator’s Guide to Interactive Flat Panels: Big Impact, Smaller Price Tag
Remember the frustration of staring at a dusty projector screen, [...]